Welcome to the Circular theme documentation! This documentation is designed to provide you with all the necessary information to help you get started with the Circular theme for your Ghost-powered website. Before diving into the documentation, it is important to have a basic understanding of Ghost and its concepts. If you are new to Ghost, we recommend referring to the official Ghost documentation to familiarize yourself with the platform.
Customization and Code Modifications:
Circular theme offers extensive customization options to personalize your website's appearance and functionality. Please exercise caution when making custom code changes, as incorrect modifications can potentially break your website's functionality or layout. It is recommended to create backups and test changes in a development environment before applying them to your live site.
Support Limitations:
Please be aware that our support for Circular theme is primarily focused on theme-specific issues and providing guidance on theme features and settings. We do not provide support for issues arising from custom code modifications or third-party integrations. If you encounter any issues or have questions related to Circular theme's built-in features and settings, please refer to the documentation or reach out to our support team for assistance. For custom code modifications and advanced customization requests, you can reach out to us—we also offer theme customization at an hourly rate.
By being mindful of these considerations, you can fully leverage the power and flexibility of Circular theme while ensuring a smooth and successful customization experience.
Upon purchasing the Circular theme, you will receive a .zip file containing the theme files. Follow the steps below to upload and activate the theme:
- Log in to your Ghost Admin dashboard and navigate to Design Settings.
- In the Design Settings page, click on the "Change theme" button located in the bottom left corner.
- Click on the "Upload theme" button in the top right corner.
- Select the Circular theme .zip file (circular.zip) either by clicking the "Select file" button or by dragging and dropping the file into the designated area.
- Once the theme is uploaded, click on the "Activate" button to activate the Circular theme.
That's it! The Circular theme is now successfully installed and ready to be customized according to your preferences. Enjoy exploring the theme's features and unleash the full potential of your Ghost-powered website.
To edit the theme files in the Circular theme, follow these steps:
- Start by opening the Circular .zip file and extracting all the files within.
- Choose the specific file you want to modify and open it using a code editor of your choice, such as Sublime Text, Visual Studio Code, Atom, or any other preferred editor.
- Make the necessary changes to the file according to your requirements, and remember to save the updated file.
- Once you have finished editing and saving the file, re-zip all the modified files to create a new .zip archive.
- Finally, upload the newly created .zip file to your Ghost Admin by following the instructions provided in the "Upload" section.
Please note that when editing theme files, it's important to have a good understanding of HTML, CSS, and Ghost theming concepts. Additionally, always make backups of the original theme files before making any changes, so you can revert back if needed.
The primary navigation is used for links that appear in the navigation bar or menu of your website. To add a link to the primary navigation, follow these steps:
- Go to the Ghost Admin Panel and navigate to the Navigation Settings.
- In the Primary navigation section, enter the name of the link in the Label field, and specify its URL in the corresponding field on the right. You can add or remove more links, and rearrange them by dragging them to change their position.
The Circular theme also supports second-level or inner links within the primary navigation. To create these sub-links, follow these guidelines:
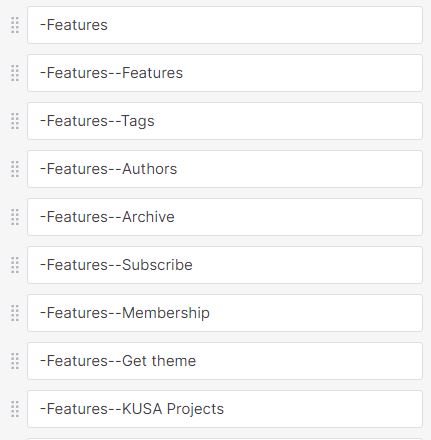
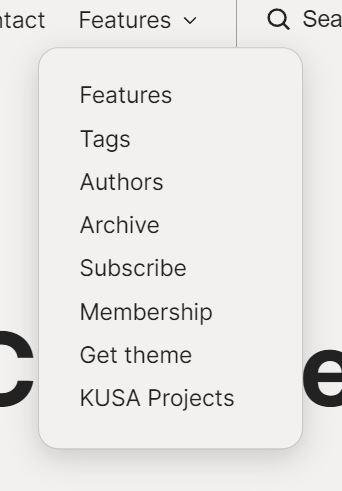
- Start by adding a Label text that will serve as a grouping for certain links. For example, if you want the label to be named "About," enter the text: "-About".
- Next, add the links that will be grouped under that label. Use the following format: "-labelname--linkname". For instance, if you want to add a link named "Home" to the "About" group, you would write it as "-About--Home".
In the example images below, you can see how the links are grouped using labels. In this case, the label for the links group is named "Features" (-Features), and it contains sub-links such as Tags (-Features--Tags), Authors (-Features--Authors), and Subscribe (-Features--Subscribe). This allows you to organize your navigation menu and create hierarchical links within the primary navigation.
The secondary navigation is used for links that appear in the footer of your website. To add a link to the secondary navigation, follow these steps:
- Go to the Ghost Admin Panel and navigate to the Navigation Settings.
- In the Secondary navigation section, enter the name of the link in the Label field, and specify its URL in the corresponding field on the right. You can add or remove more links, and rearrange them by dragging them to change their position.
The Circular theme also supports second-level or inner links within the secondary navigation. To create these sub-links, follow these guidelines:
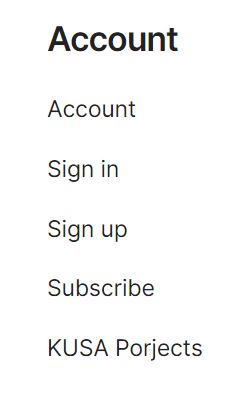
- Start by adding a Label text that will serve as a grouping for certain links. For example, if you want the label to be named "About," enter the text: "-About".
- Next, add the links that will be grouped under that label. Use the following format: "-labelname--linkname". For instance, if you want to add a link named "Home" to the "About" group, you would write it as "-About--Home".
In the example images below, you can see how the links are grouped using labels. In this case, the label for the links group is named "Account" (-Account), and it contains sub-links such as Sign in (-Account--Sign in), Sign up (-Account--Sign up), and Subscribe (-Account--Subscribe). This allows you to organize your navigation menu and create hierarchical links within the secondary navigation.

The Circular theme includes a custom-made page for displaying all of the authors on your website. To add this page, follow these steps:
- From your Ghost admin dashboard, navigate to the Pages section (located in the left tab).
- Click on the "New page" button in the top right corner.
- In the page editor, enter a title for your page. This will be displayed as the heading on the Authors page.
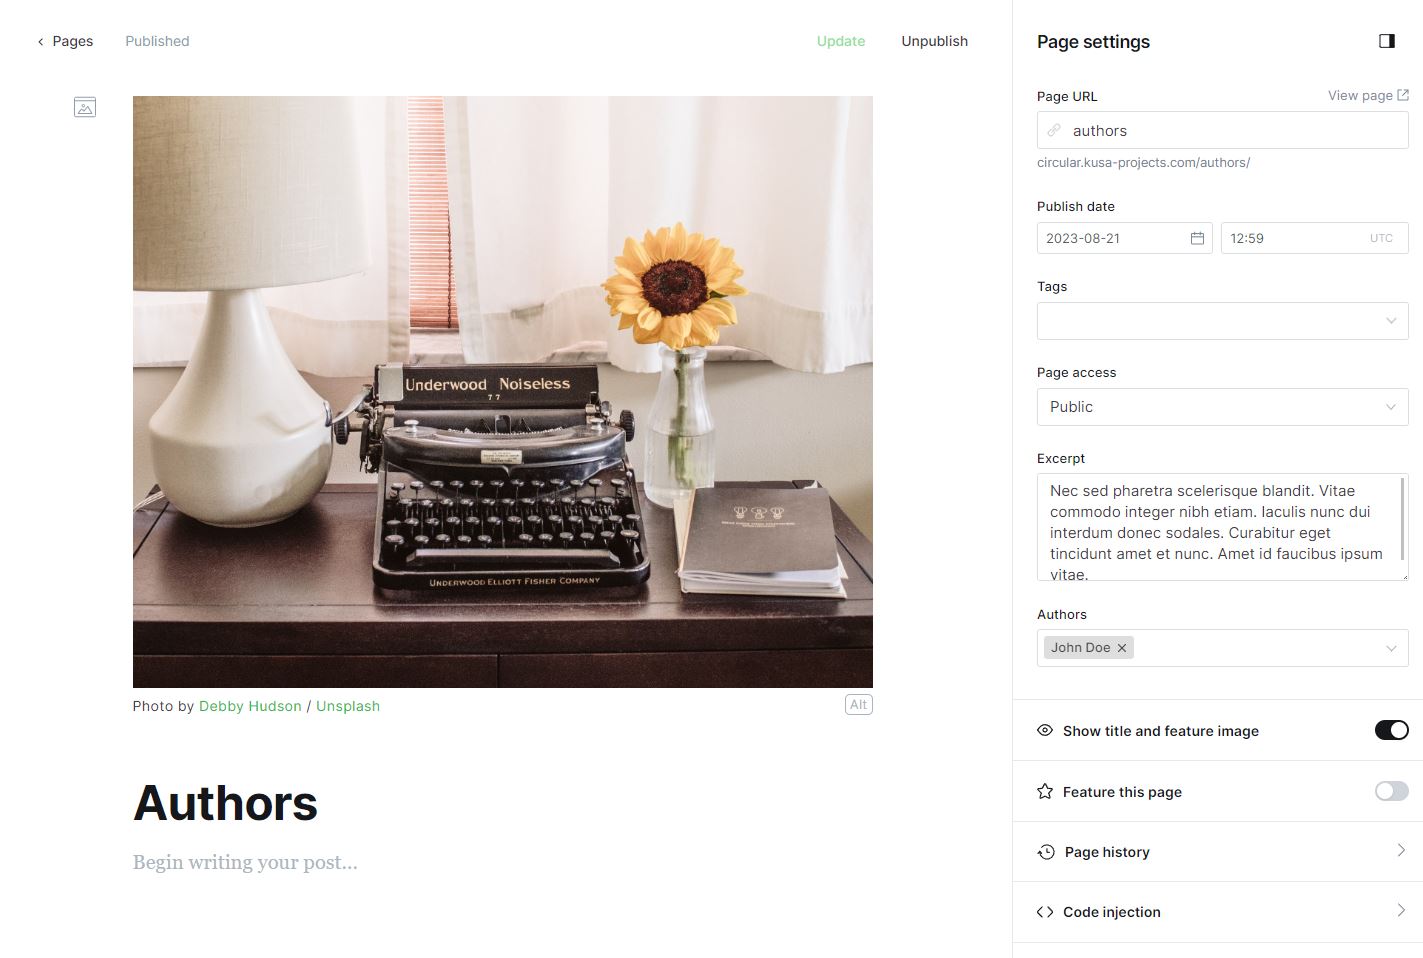
- Click on the page settings icon (located in the top right corner) and provide a description in the Excerpt field. This description will appear below the heading on the page. You can also add a feature image.
- IMPORTANT: In the page settings, make sure to set the Page URL field to "authors". It is essential to use this specific URL name for the feature to work correctly. If you choose a different URL, this functionality may not function as intended.
- Refer to the image below for an example of how the Authors page should be set up.
- Once you have finished configuring the page settings and adding content, click on the "Publish" button located in the top right corner. This will make the Authors page accessible to your website visitors.
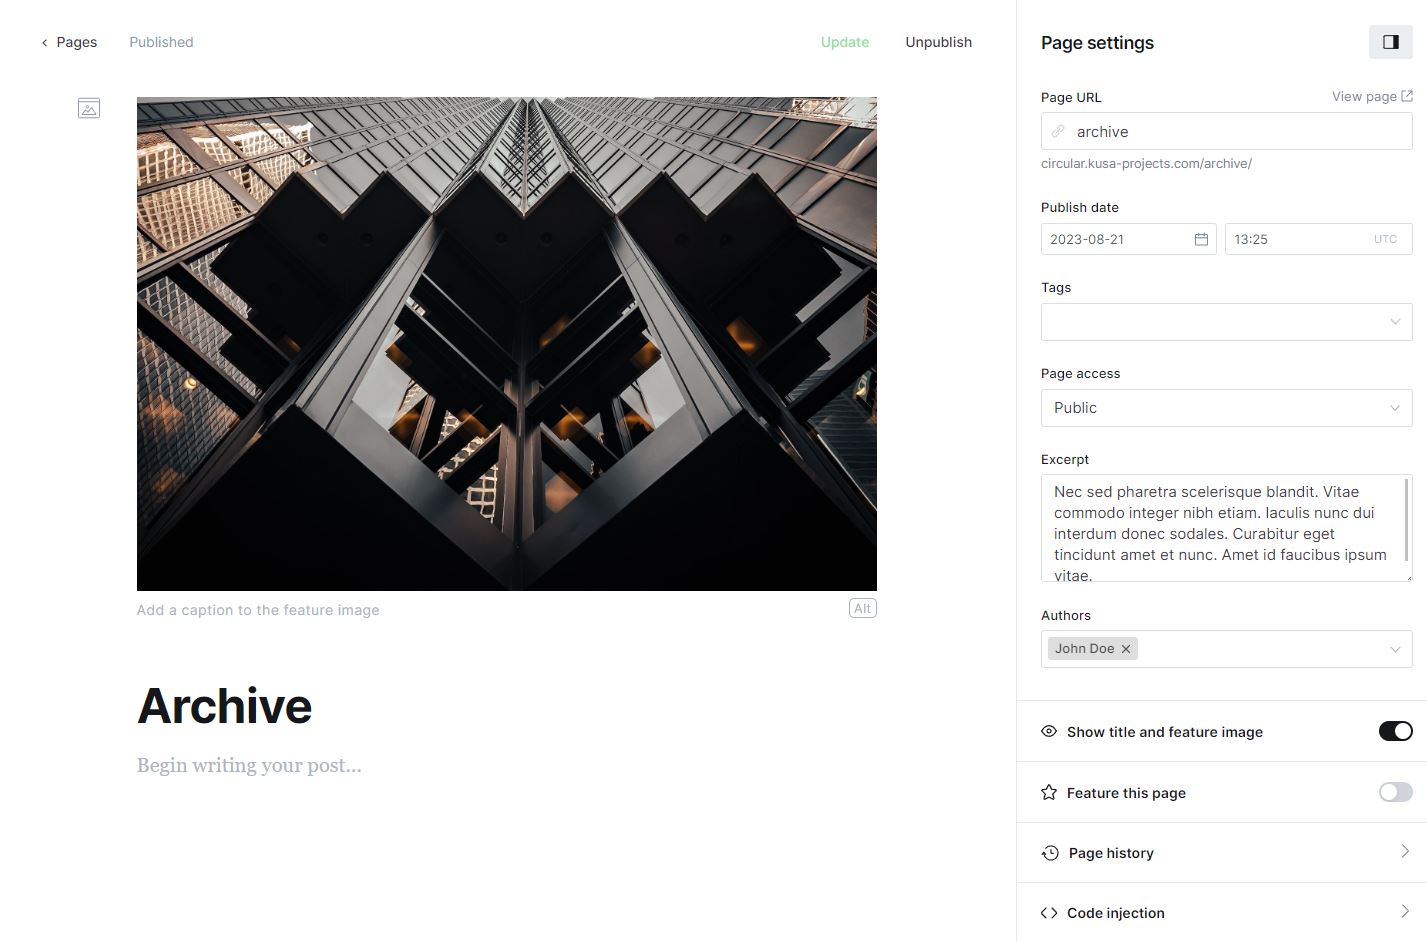
The Circular theme includes a custom-made page for displaying all posts ordered by date on your website. To add this page, follow these steps:
- From your Ghost admin dashboard, navigate to the Pages section (located in the left tab).
- Click on the "New page" button in the top right corner.
- In the page editor, enter a title for your page. This will be displayed as the heading on the Tags page.
- Click on the page settings icon (located in the top right corner) and provide a description in the Excerpt field. This description will appear below the heading on the page. You can also add a feature image.
- IMPORTANT: In the page settings, make sure to set the Page URL field to "archive". It is essential to use this specific URL name for the feature to work correctly. If you choose a different URL, this functionality may not function as intended.
- Refer to the image below for an example of how the Archive page should be set up.
- Once you have finished configuring the page settings and adding content, click on the "Publish" button located in the top right corner. This will make the Archive page accessible to your website visitors.
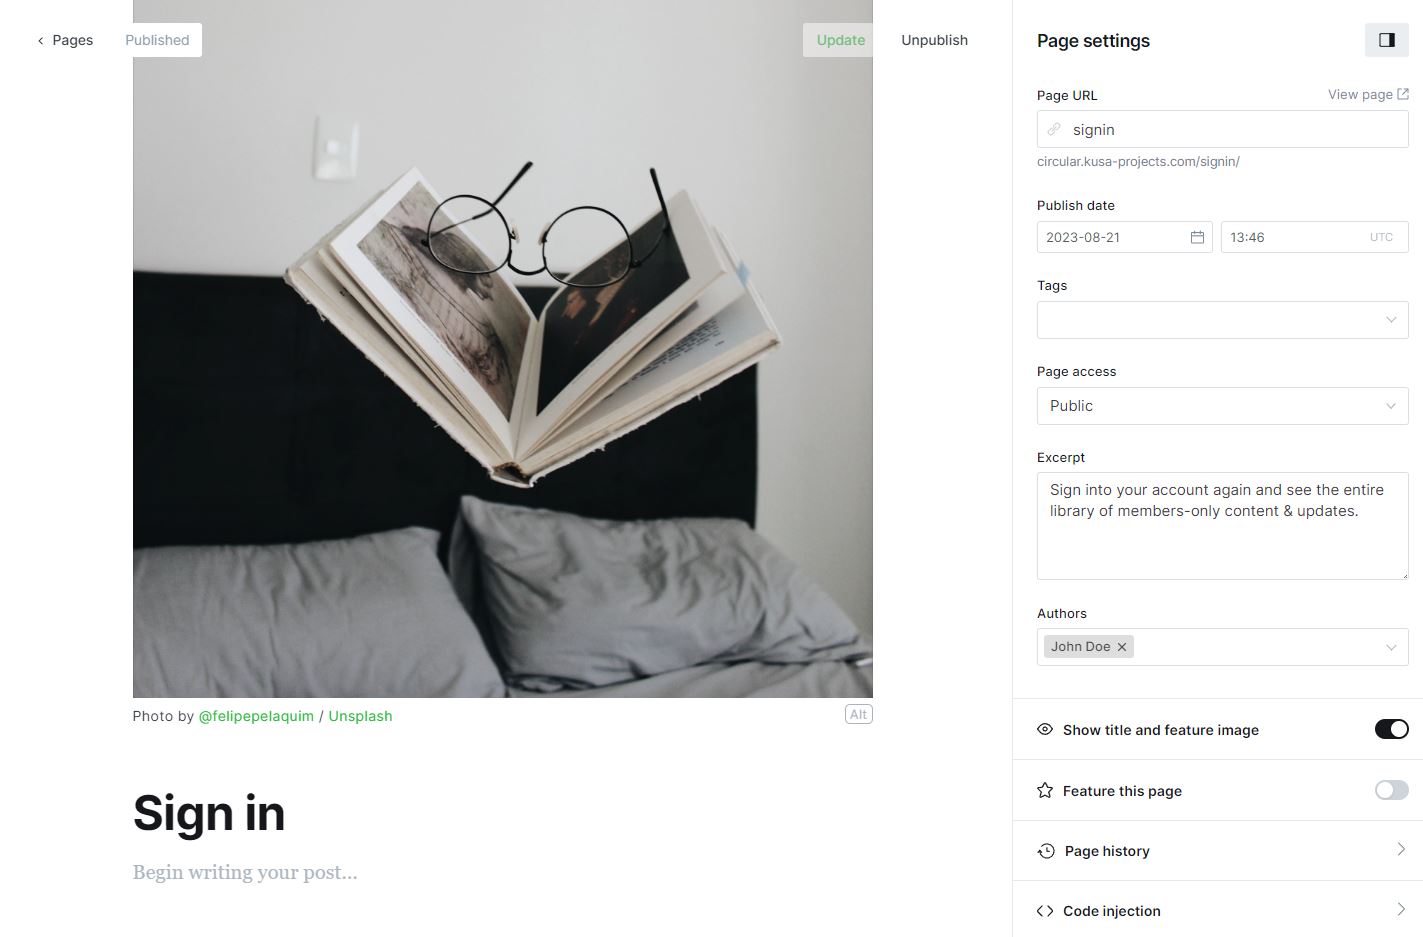
The Circular theme includes a custom-made Sign in page. To add this page, follow these steps:
- From your Ghost admin dashboard, navigate to the Pages section (located in the left tab).
- Click on the "New page" button in the top right corner.
- In the page editor, enter a title for your page. This will be displayed as the heading on the Tags page.
- Click on the page settings icon (located in the top right corner) and provide a description in the Excerpt field. This description will appear below the heading on the page. You can also add a feature image.
- IMPORTANT: In the page settings, make sure to set the Page URL field to "signin". It is essential to use this specific URL name for the feature to work correctly. If you choose a different URL, this functionality may not function as intended.
- Refer to the image below for an example of how the Sign in page should be set up.
- Once you have finished configuring the page settings and adding content, click on the "Publish" button located in the top right corner. This will make the Sign in page accessible to your website visitors.
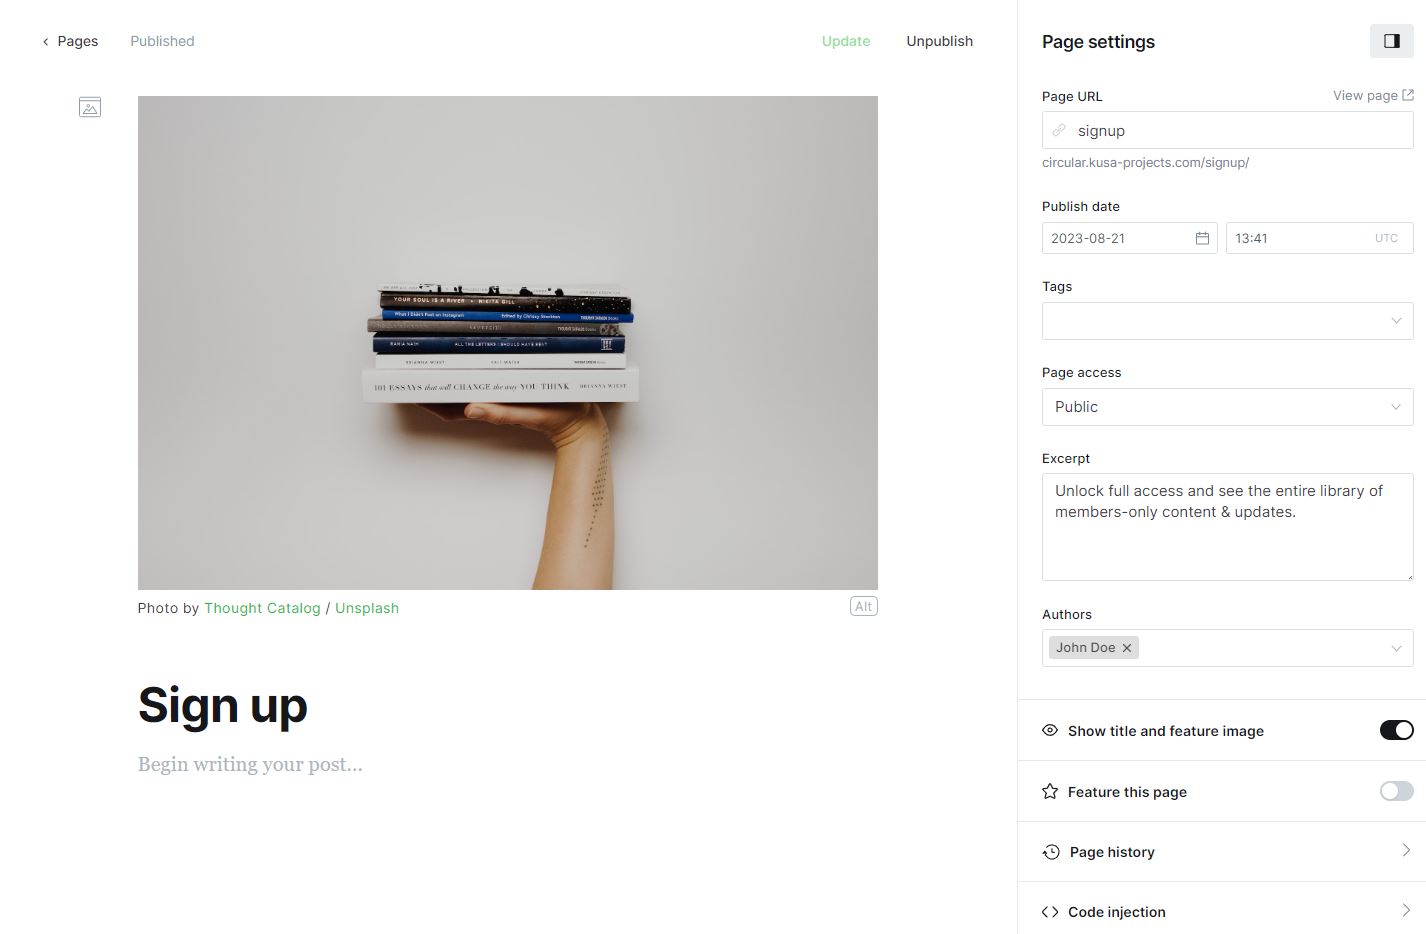
The Circular theme includes a custom-made Sign up page. To add this page, follow these steps:
- From your Ghost admin dashboard, navigate to the Pages section (located in the left tab).
- Click on the "New page" button in the top right corner.
- In the page editor, enter a title for your page. This will be displayed as the heading on the Tags page.
- Click on the page settings icon (located in the top right corner) and provide a description in the Excerpt field. This description will appear below the heading on the page. You can also add a feature image.
- IMPORTANT: In the page settings, make sure to set the Page URL field to "signup". It is essential to use this specific URL name for the feature to work correctly. If you choose a different URL, this functionality may not function as intended.
- Refer to the image below for an example of how the Sign up page should be set up.
- Once you have finished configuring the page settings and adding content, click on the "Publish" button located in the top right corner. This will make the Sign up page accessible to your website visitors.
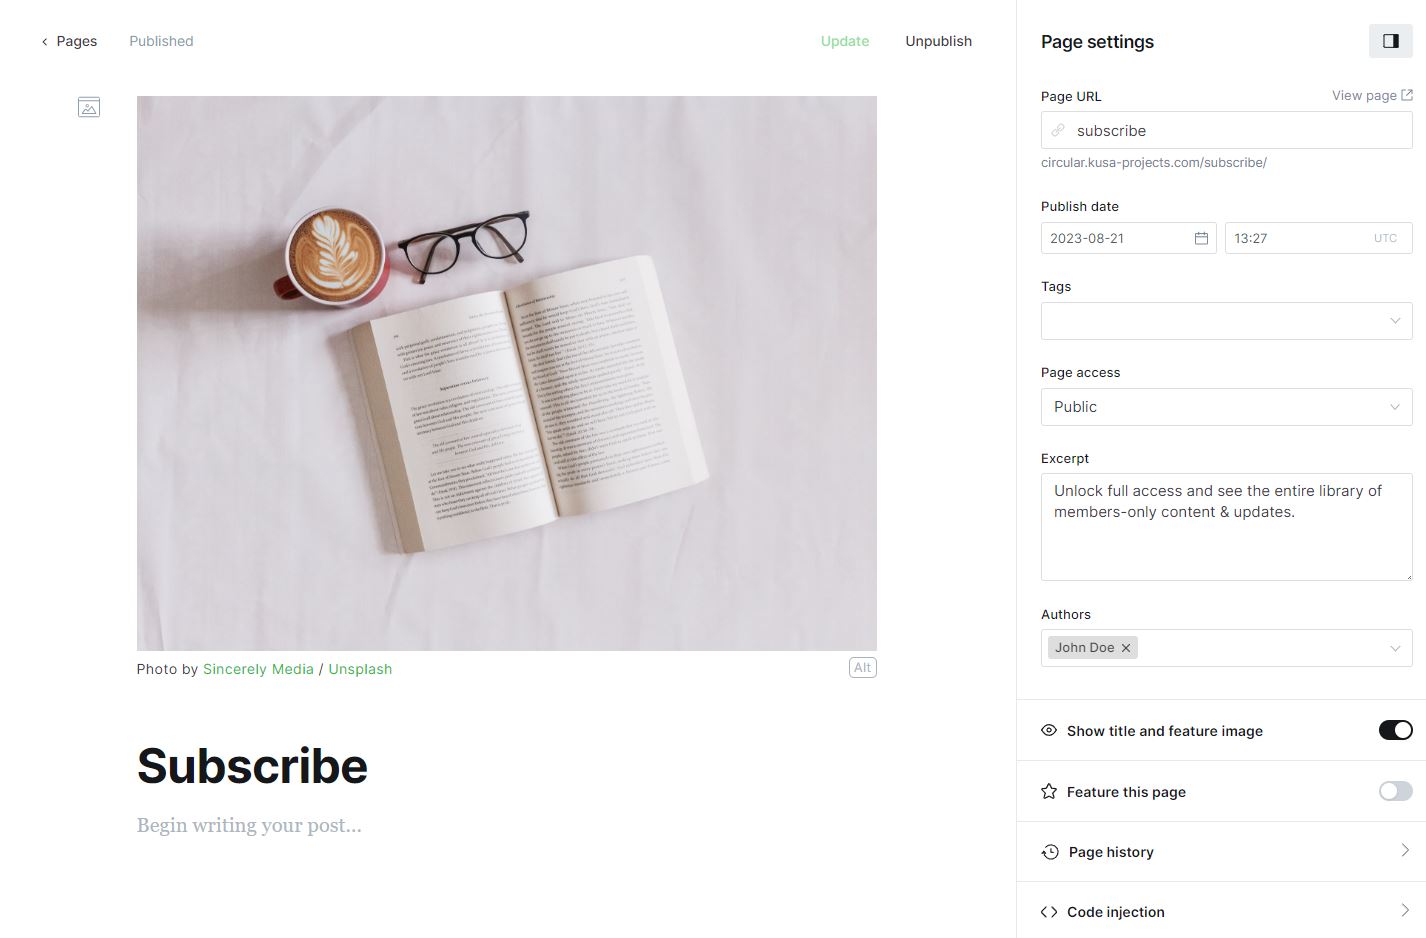
The Circular theme includes a custom-made Subscribe page. To add this page, follow these steps:
- From your Ghost admin dashboard, navigate to the Pages section (located in the left tab).
- Click on the "New page" button in the top right corner.
- In the page editor, enter a title for your page. This will be displayed as the heading on the Tags page.
- Click on the page settings icon (located in the top right corner) and provide a description in the Excerpt field. This description will appear below the heading on the page. You can also add a feature image.
- IMPORTANT: In the page settings, make sure to set the Page URL field to "subscribe ". It is essential to use this specific URL name for the feature to work correctly. If you choose a different URL, this functionality may not function as intended.
- Refer to the image below for an example of how the Subscribe page should be set up.
- Once you have finished configuring the page settings and adding content, click on the "Publish" button located in the top right corner. This will make the Subscribe page accessible to your website visitors.
The Circular theme includes a custom-made Account page. To add this page, follow these steps:
- From your Ghost admin dashboard, navigate to the Pages section (located in the left tab).
- Click on the "New page" button in the top right corner.
- In the page editor, enter a title for your page. This will be displayed as the heading on the Tags page.
- IMPORTANT: In the page settings, make sure to set the Page URL field to "account ". It is essential to use this specific URL name for the feature to work correctly. If you choose a different URL, this functionality may not function as intended.
- Refer to the image below for an example of how the Account page should be set up.
- Once you have finished configuring the page settings and adding content, click on the "Publish" button located in the top right corner. This will make the Account page accessible to your website visitors.

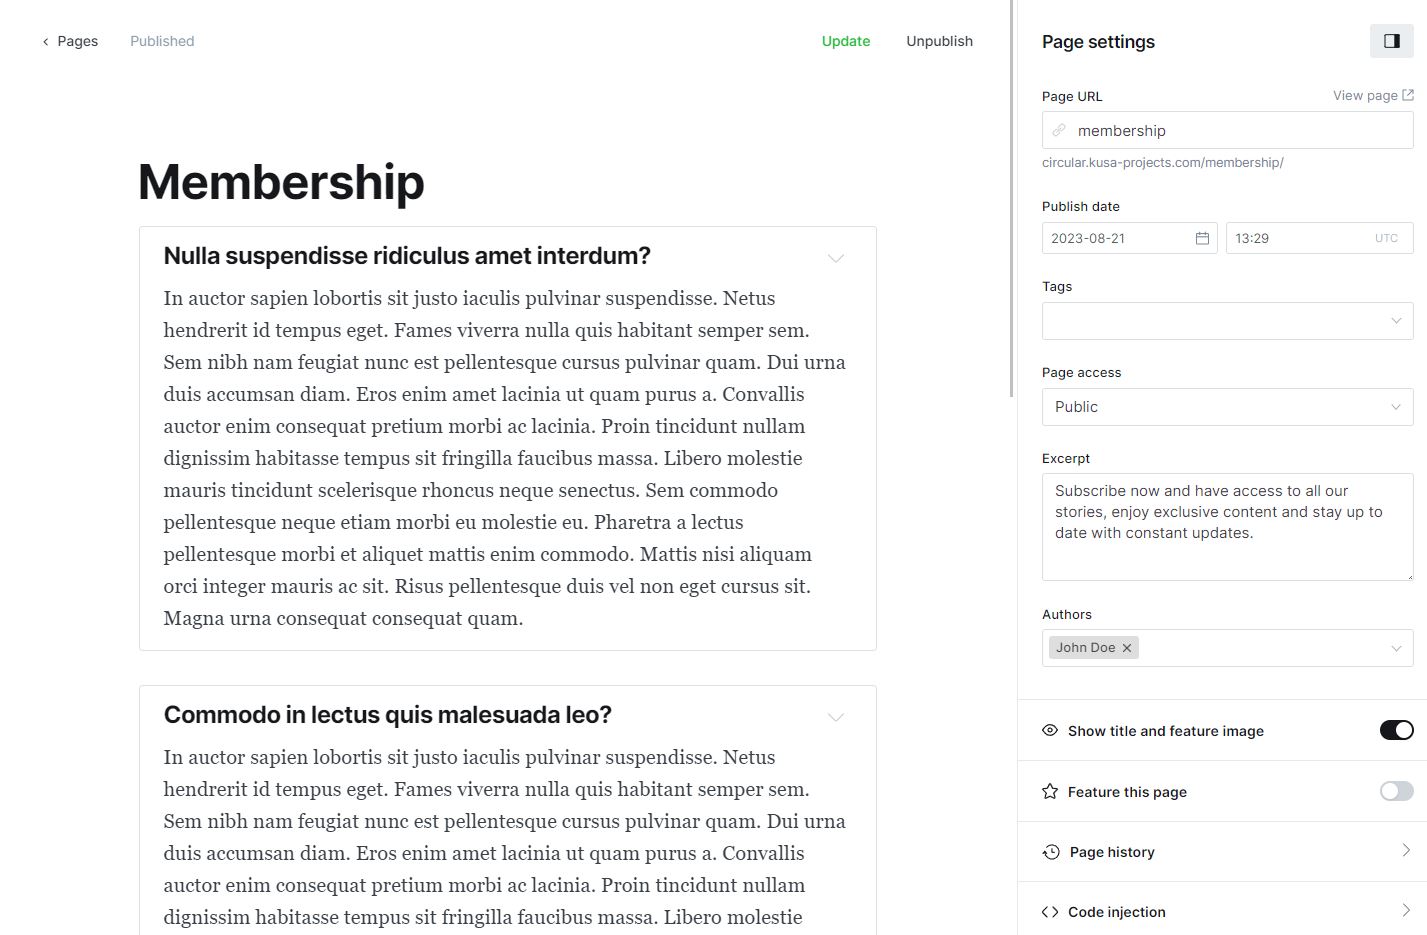
The Circular theme includes a custom-made page for displaying the membership tiers (yearly and monthly) and FAQ's on your website. To add this page, follow these steps:
- From your Ghost admin dashboard, navigate to the Pages section (located in the left tab).
- Click on the "New page" button in the top right corner.
- In the page editor, enter a title for your page. This will be displayed as the heading on the Membership page.
- In the page editor you can add as many Toggle elements as you want. This will display the FAQ section. Please note that any other elements are not styled or supported on this page.
- Click on the page settings icon (located in the top right corner) and provide a description in the Excerpt field. This description will appear below the heading on the page.
- IMPORTANT: In the page settings, make sure to set the Page URL field to "membership". It is essential to use this specific URL name for the feature to work correctly. If you choose a different URL, this functionality may not function as intended.
- Refer to the image below for an example of how the Membership page should be set up.
- Once you have finished configuring the page settings and adding content, click on the "Publish" button located in the top right corner. This will make the Membership page accessible to your website visitors.
The Circular theme offers five distinct color schemes for your website: Elegant, Light, Dark, Shadow and Vibrant. To customize the color scheme, simply follow these steps:
- Access the Design settings page in your Ghost admin dashboard.
- Open the Site-wide dropdown under the Site design section.
- Select the desired color scheme on the Color scheme dropdown.
- Click the Save button located in the top-right corner to apply the changes.
The Circular theme provides the flexibility to set the number of posts on a slider. To modify this setting, follow the steps below:
- Access the Design settings page in your Ghost admin dashboard.
- Open the Site-wide dropdown under the Site design section.
- Select the desired number of posts (1-8) on the Number of posts on slider dropdown.
- Click the Save button located in the top-right corner to apply the changes.
The Circular theme provides the flexibility to choose between normal or slider hero section for secondary pages (Tags, Tag, Authors etc.). To modify this setting, follow the steps below:
- Access the Design settings page in your Ghost admin dashboard.
- Open the Site-wide dropdown under the Site design section.
- Check/uncheck the toggle button for Use slider hero section in secondary pages.
- Click the Save button located in the top-right corner to apply the changes.

Default hero section on Tags page
Slider hero section on Tags page
The Circular theme provides the flexibility to choose between 10 primary fonts (Inter, Montserrat, Roboto, Open Sans, Lato, Poppins, Raleway, Noto Sans, Merriweather, Playfair Display). To modify this setting, follow the steps below:
- Access the Design settings page in your Ghost admin dashboard.
- Open the Site-wide dropdown under the Site design section.
- Select the desired font on the Primary font dropdown.
- Click the Save button located in the top-right corner to apply the changes.
The Circular theme provides the flexibility to choose between 10 secondary fonts (Inter, Montserrat, Roboto, Open Sans, Lato, Poppins, Raleway, Noto Sans, Merriweather, Playfair Display). Secondary font is used for slider numbers and membership prices. To modify this setting, follow the steps below:
- Access the Design settings page in your Ghost admin dashboard.
- Open the Site-wide dropdown under the Site design section.
- Select the desired font on the Secondary font dropdown.
- Click the Save button located in the top-right corner to apply the changes.
The Circular theme provides the flexibility to choose between custom account pages or default Ghost Portal popups for Sign in, Sign up, Subscribe and Account. To modify this setting, follow the steps below:
- Access the Design settings page in your Ghost admin dashboard.
- Open the Site-wide dropdown under the Site design section.
- Check/uncheck the toggle button for Use custom account pages.
- Click the Save button located in the top-right corner to apply the changes.
The Circular theme allows you to use beautiful page transition animations. To modify this setting, follow the steps below:
- Access the Design settings page in your Ghost admin dashboard.
- Open the Site-wide dropdown under the Site design section.
- Check/uncheck the toggle button for Use page load animations.
- Click the Save button located in the top-right corner to apply the changes.
The Circular theme allows you to use rounded corners for overlays on desktop devices. To modify this setting, follow the steps below:
- Access the Design settings page in your Ghost admin dashboard.
- Open the Site-wide dropdown under the Site design section.
- Check/uncheck the toggle button for Use rounded corners on desktop background overlays.
- Click the Save button located in the top-right corner to apply the changes.
Because some layouts use light logo and others dark, Circular enables you to add a normal logo and a Light logo. To modify this setting, follow the steps below:
- Access the Design settings page in your Ghost admin dashboard.
- Open the Site-wide dropdown under the Site design section.
- Add logo image for Light logo setting.
- Click the Save button located in the top-right corner to apply the changes.
The Circular theme allows you to scale your logo. To modify this setting, follow the steps below:
- Access the Design settings page in your Ghost admin dashboard.
- Open the Site-wide dropdown under the Site design section.
- Select the desired scale factor on the Logo scale dropdown.
- Click the Save button located in the top-right corner to apply the changes.
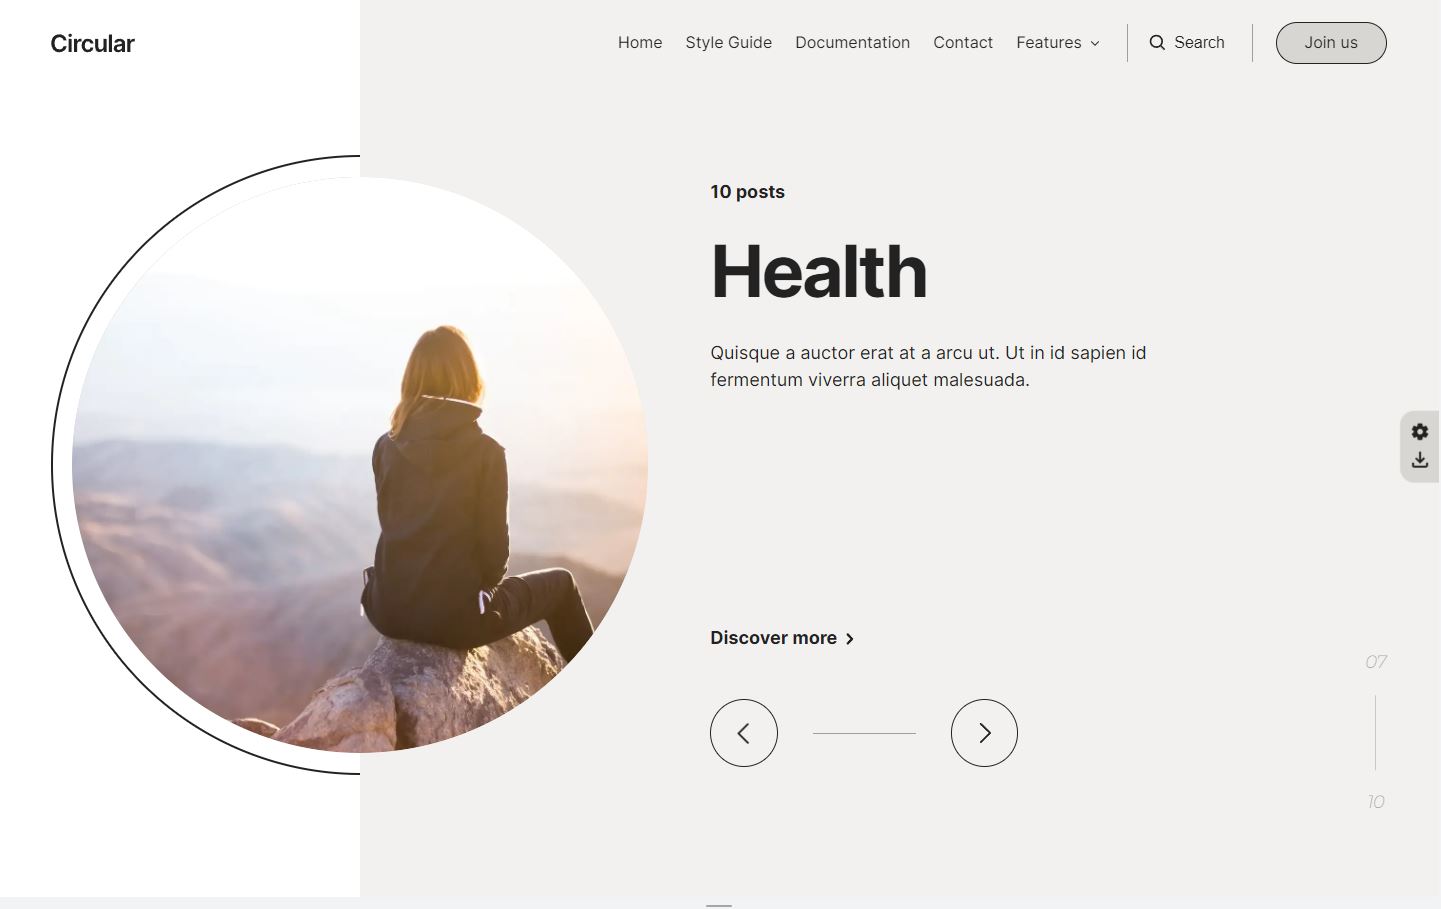
The Circular theme offers a visually appealing featured posts section with sticky functionality. You can easily showcase your selected blog posts by marking them as "Featured". Here's how to utilize this section:
- Open the desired blog post you want to feature.
- Click on the Post Settings icon (top right corner).
- Look for the "Feature this post" checkbox and make sure to check it.
- Repeat the process to populate the featured stories section.
By highlighting specific blog posts as featured, you can draw attention to your most important or captivating content. Take advantage of this dynamic section to engage your audience and showcase your best work.
The Circular theme supports translation, allowing you to translate all static text on your website into different languages. By default, the theme is in English, but you can add your own translations. To do so, follow these steps:
- Download and unzip/extract the theme files.
- Locate the "locales" folder and open it.
- Inside the "locales" folder, you'll find a file named "en.json". Duplicate this file and rename the duplicate to the language you want to translate to. Ensure that you name it using a valid language code. For example, "es.json" for Spanish and "pl.json" for Polish.
- Open the translated file using a text editor.
- The file will have a structure like this:
{
"Back": "Back",
"Newer Posts": "Newer Posts",
"Older Posts": "Older Posts"
}
To change the translation, modify the text on the right-hand side while keeping the left-hand side unchanged. For example, to translate into Spanish (es.json):
{
"Back": "Volver",
"Newer Posts": "Artículos Siguientes",
"Older Posts": "Artículos Anteriores"
} - Translate all the text strings accordingly and save the file.
- Re-zip all the theme files and upload the updated theme to your Ghost admin panel. Publish the theme.
- Navigate to General Settings in the admin panel and locate the "Publication language" section. Change the locale name to the language you've translated the theme into. For example, "en" for English, "es" for Spanish, etc.
- Click on the Save button at the top right corner to apply the changes.
To modify the static text in the Circular theme, follow these steps:
- Download and unzip/extract the theme files.
- Locate the "locales" folder and open it.
- Inside the "locales" folder, you'll find a file named "en.json". Open this file in a text editor.
- The file will have a structure like this:
{
"Back": "Back",
"Newer Posts": "Newer Posts",
"Older Posts": "Older Posts"
}
To change the text, edit the right side of each key-value pair while keeping the left side unchanged. For example:
{
"Back": "Previous",
"Newer Posts": "New Stories",
"Older Posts": "Old Stories"
} - Modify all the desired text strings and save the file.
- Re-zip all the theme files and upload the updated theme back to your Ghost admin panel. Publish the theme.
By following these steps, you can customize the static text in the Circular theme to better suit your preferences and provide a personalized experience for your website visitors.
To change the number of posts displayed per pagination page in the Circular theme, follow these steps:
- Download and unzip/extract the theme files.
- Locate the "package.json" file and open it in a text editor.
- In the "package.json" file, locate the following section of code:
"posts_per_page": 6
Change the number 6 to your desired value. For example, if you want to display 9 posts per page change it to 9:
"posts_per_page": 9
- Once you have made the desired changes, save the "package.json" file.
- Rezip all the modified theme files and upload the updated zip file to your Ghost admin panel.
- Publish the updated theme to apply the changes to the number of posts per pagination page.
Please be cautious while modifying the theme files and ensure you have a backup in case any issues arise during the process. If you are unsure about making code modifications, it's best to seek assistance from a professional or developer who can help you with the desired changes while ensuring the integrity and stability of your website.


